As we've discussed before on this blog, we're constantly amazed when people use our products in ways we'd not even thought of. So when Michael Axelsson and Bill Williams got in touch to tell us what they were doing with a pi-top, we were blown away. Here they are in their own words, to tell us more.
Introduction
I am a scientist/teacher in comparative cardiovascular physiology at the University of Gothenburg in Sweden and since 2013 and I am also a coordinator for the Scandinavian Microsurgery Academy. When teaching microsurgery, it is important to be able to view and follow the work done by the students and, traditionally, this was done using side tubes on the microscopes. There are several drawbacks with side tubes, one is the price, around €5,000 per microscope, the other is that as an instructor you need to stand next to the microscope and can only follow what one student is doing at the time.
Side tubes are now replaced by a camera-screen system. This makes it possible to follow more students at the same time and identify students that need instructions easier. These systems also allow saving still images and video at various resolutions. In a teaching situation, it is also important that the live feed from any of the workstations can be shown on the main screen in order for the entire group to see a specific procedure or result. In many commercial systems, this is not possible without hardwiring the individual camera system to the main screen. Professional camera systems are expensive – the cheapest starts at around €1,000.
With nine workstations in the training lab and the cost for commercial viewing system, I started to look for a cheaper, but yet fully functional solution.
Hardware selection and design
Initially, I had been investigating and tested to use less expensive hardware (tablets and USB cameras) and 3-D printed parts in order to capture video and photos from various types of microscopes. After further research, I instead selected the Raspberry Pi Model 3 as the computer system, a Raspberry Pi camera module V2 with an HDMI Cable Extension and an SD card, which contains the Raspbian operating system and control software. For viewing a Sunfounder 10” touch screen with a 3D printed enclosure was selected due to the larger size screen.
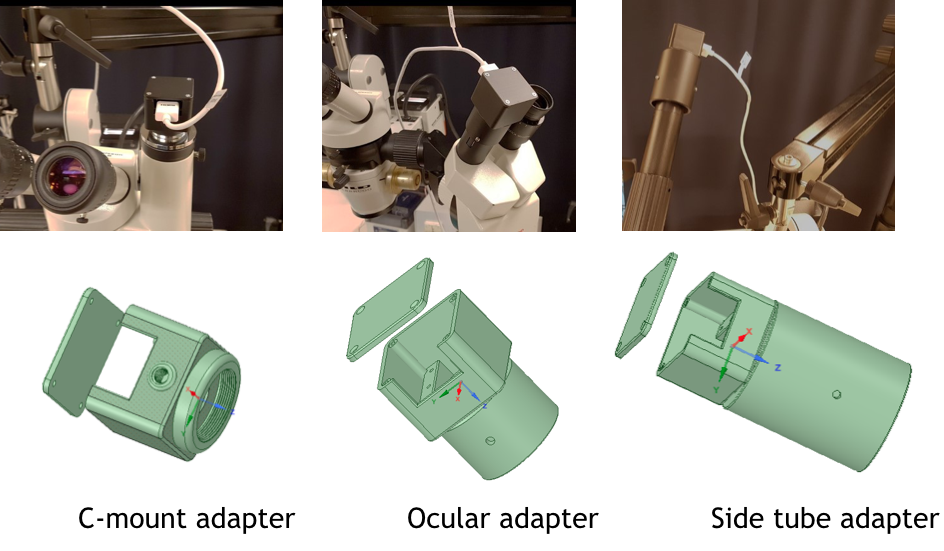
The Raspberry Pi camera module is a “bare board” module and needs 3D printed adapters to mount the camera into the microscope. Having experience in 3D direct modelling, I started with the camera adapters, one for c-mount (for microscopes with a photo-tube), one for mounting the camera on a side tube and one for mounting the camera in an ocular tube (see figure 1). They were modelled in SpaceClaim and printed on a Formlab 2 printer. The STL file for all adapters are freely available to download from Sketchfab.

I have limited skills in programming so I searched for help in various online forums. Eventually, I contacted Bill Williams about possible modifications to his PiCameraApp program for use with this project.
Software design
When I contacted Bill with his idea, he was on board immediately and began thinking about the necessary changes to the PiCameraApp software based on the requirements for the microsurgery training system. However, after further discussions, Bill decided to develop a user interface from scratch. Based on the hardware design and needs, Bill developed the microVIEW software optimized for a 1280x800 touch screen display running in full-screen mode. Where possible, all controls are simple pushbuttons or sliders that were created specifically for microVIEW. There are no text fields in the option panels. The buttons and sliders have been enlarged to minimize 'touch' errors. In general, during normal operation, a keyboard should not be needed. The software is freely available under the GNU General Public License from GitHub.
microVIEW was developed using the Python programming language with the Tkinter library for the user interface. Python is an extremely powerful language and provides a wide variety of optional libraries that could be used such as image recognition/analysis and numerical analysis.
microVIEW provides the following capabilities:
- Interface optimized for touchscreens (but can also be used on other screens by attaching a mouse to the Raspberry Pi).
- View live video full screen in different resolution settings up to 30fps at up to 1920x1080 resolution (1080p).
- Adjust the camera settings. Note that not all Raspberry Pi Camera setting are available in microVIEW. This was a deliberate design decision in order to minimize 'clutter' in the user interface.
- Save still images (up to a maximum of 3280 × 2464 pixels)
- Save video (up to 1080 p30)
- Create time-lapse videos, photos, or both.
- Annotate the video/images with date and time information and simple text information.
- Stream the live feed over the internet.
- Change the interface language. A separate language file (microVIEW.language) allows users to customize the interface without any programming knowledge.
- Automatic saving of current settings to an initialization file (microVIEW.INI).
As updates and changes are made, we continually test them in the lab in Gothenburg with the hardware providing the necessary feedback to resolve software bugs or add additional features.
Integration
The Sunfounder 10” screen selected for the project needs a “house”, a table stand and an arm which increase the total price.
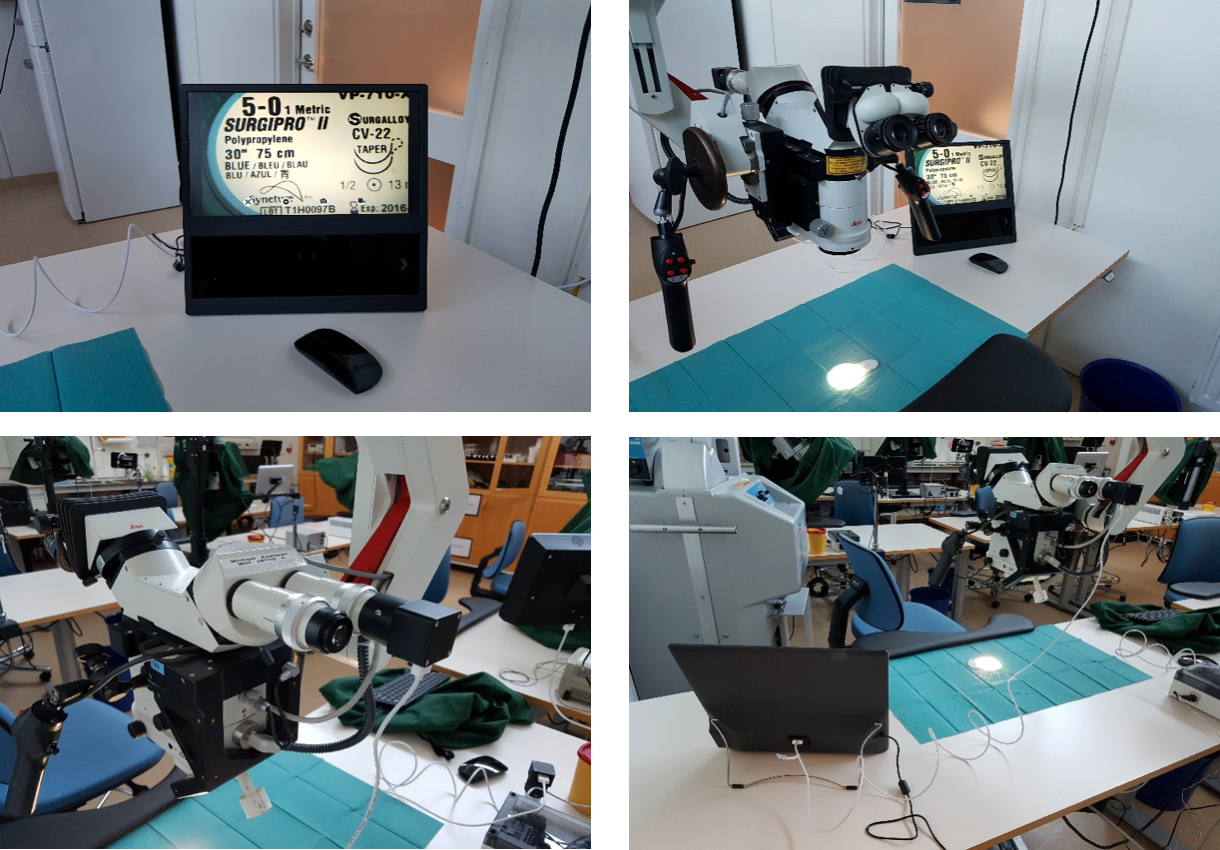
The pi-topCEED offers a nice solution, it is a free-standing system with a bigger (14”) screen and the Raspberry Pi fits nicely behind a sliding cover. But (there always seems to be a BUT) the pi-topCEED does not (in its current version) have a port for the Raspberry Pi camera. There is space behind the sliding cover that allows you to install a holder for an HDMI adapter that can then be connected to the Raspberry Pi camera port. Making a hole in the case and installing a 3D printed holder for a HDMI adapter is easy. The STL file for the adapter is freely downloadable. The camera can then be connected via an HDMI cable. The pi-topCEED screen is not a touch screen but Bill updated the microVIEW software so that it provides a mouse cursor overlay when in full-screen mode, allowing the use of a mouse which solves this problem.


Conclusion
This system (Raspberry Pi computer, camera module and pi-topCEED) has an overall low price tag that makes it an affordable solution for both microsurgery training at the University level and STEM education in the school system that normally cannot afford expensive microscopes or camera solutions. In many cases, younger kids also have a hard time using a binocular microscope which is solved if they can see the images on a screen. In a class situation with only one microscope, only one student at the time can use the microscope. However, with microVIEW, the feed from the camera can be streamed and viewed on a projector - perfect for classroom settings or large viewing audiences. Smaller groups can all view the screen directly on the pi-topCEED.

The microVIEW software, in combination with the adapters for the Raspberry Pi camera and the pi-topCEED system, is already used in the microsurgery training in Gothenburg as well as in the surgery room at the research floor in my lab. The pi-topCEED solution will be presented at the School program at the upcoming Science festival in Gothenburg.
We are confident that it is only a matter of time before pi-topCEED moves from the University microsurgery training environment to being used for STEM education for younger students.
About the authors
Michael Axelsson is a scientist and teacher in comparative cardiovascular physiology at the University of Gothenburg in Sweden and since 2013. He is also a coordinator for the Scandinavian Microsurgery Academy.
Bill Williams is a retired engineer formerly in charge of Advanced Development Programs and Research and Development for a Defense firm in the United States. He is a firm believer in STEM education and has worked with local schools helping to promote these ideas and concepts.